
Why Portable Arms Need Different Power Planning
Every power calculation on this site up to this point assumes a wall-powered bench supply: pick a regulated DC brick with enough continuous amperage and inrush headroom, and you're done. A portable arm — one that has to move around on a mobile base, a backpack rig, or a demo cart without a cord — removes that option entirely, and it changes three things at once: the source has to store energy rather than just deliver it, it has to fit on the arm's structure without wrecking the balance, and it has to fail safely if something goes wrong, because a battery fault doesn't just trip a breaker the way a wall supply does.
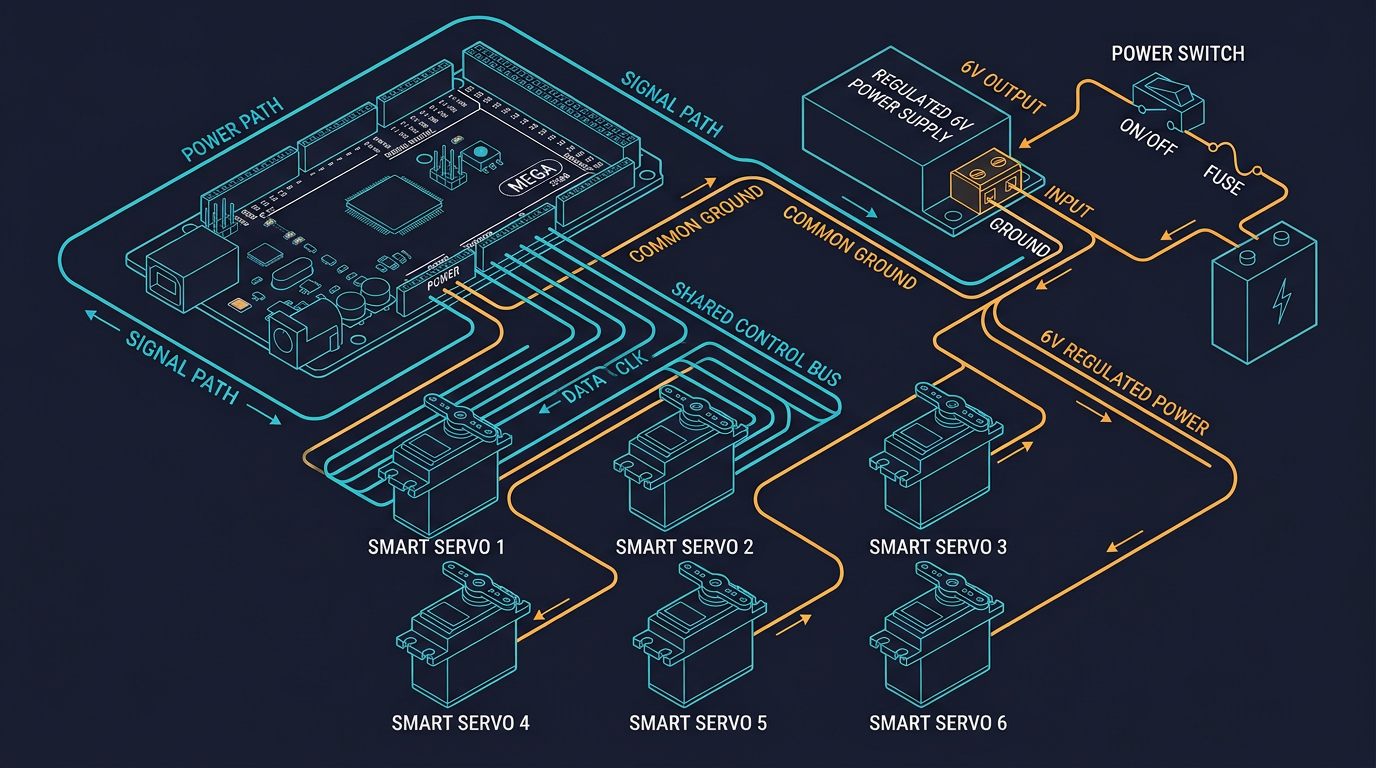
The current-budget math from our Arduino Mega wiring guide still applies here — you still need to know your peak and average current draw. What changes is what you do with that number once you have it.
Battery Chemistry Comparison
Four chemistries show up regularly in hobbyist and educational robot arm builds. None of them is universally “best” — the right choice depends on whether the arm is genuinely mobile or just occasionally unplugged, and how much handling risk you're willing to accept.
| Chemistry | Nominal Cell Voltage | Energy Density | Typical Continuous Discharge | Handling Risk |
|---|---|---|---|---|
| LiPo (pouch) | 3.7V/cell | Highest | 15–30C common | Fire risk if punctured, overcharged, or over-discharged |
| Li-ion (18650 cylindrical) | 3.6–3.7V/cell | High | 2–10C, cell-dependent | Lower fire risk than LiPo pouches; still needs a BMS |
| Sealed lead-acid (SLA/AGM) | 2.0V/cell (6V or 12V packs) | Low | 0.2–1C typical | Tolerant of abuse; heavy; no thermal runaway risk |
| NiMH | 1.2V/cell | Medium–low | 1–3C typical | Tolerant; self-discharges faster in storage |
For a genuinely mobile arm where every gram on a moving joint costs torque, LiPo or 18650 Li-ion packs are the practical choice. For a stationary desktop arm that's simply “unplugged for a demo,” a sealed lead-acid brick under the base is a reasonable, low-drama option — heavy, but the weight sits at the base where it doesn't cost you anything mechanically, and it forgives the kind of careless charging that would damage a lithium pack.
Matching Voltage to Your Servo Bus
Smart servos expect a specific rail voltage, commonly 6V or 12V as covered in our wiring guide. A raw lithium pack doesn't sit at a fixed voltage — it starts near its full-charge voltage and sags as it discharges, which is a problem because servo torque and speed both shift with rail voltage. A 3S LiPo (nominal 11.1V) actually swings from about 12.6V fully charged down to roughly 9.9V near empty — well outside a servo's rated 12V window at both ends.
Rather than wiring the raw pack straight to the servo bus, use a buck (or buck-boost) regulator rated for your peak current to hold the servo rail at a fixed voltage regardless of where the battery sits in its discharge curve. This keeps joint behavior consistent from a full charge down to your low-voltage cutoff, instead of the arm getting visibly weaker and slower as the battery drains.
I skipped the regulator on an early portable version of my arm, running the servo bus straight off a 3S LiPo on the theory that “12.6V is close enough to 12V.” It wasn't a wiring failure — everything ran — but the arm's grip force and joint speed noticeably dropped over the last third of the discharge curve, and two of the smaller wrist servos ran hotter than they did on the regulated bench supply. Adding an 11A buck converter set to a fixed 12.0V output fixed the inconsistency completely; the arm behaves identically at 90% charge and at 20%.
Capacity Calculation, Step by Step
Battery capacity sizing starts from the same current-budget thinking as a wall supply, but the target changes from “enough current” to “enough current for enough time.” Here's a worked example for a 6-servo desktop-scale arm, extending the duty-cycle approach from our wiring guide:
Step 1 — Estimate average system current: Using the same 25% duty-cycle assumption as the wiring guide, 6 servos at 1.8A stall each average roughly 0.45A per servo, plus about 0.3A for the controller and any sensors.
Step 2 — Set a target runtime and calculate capacity: For a target of 45 minutes of active, intermittent operation between charges:
Step 3 — Add a margin for aging and voltage sag: Battery capacity degrades with cycle count, and usable capacity is lower than nameplate capacity near the low-voltage cutoff.
This is the minimum capacity for runtime. It is a separate question from whether the pack can actually deliver your peak current — that's covered next.
C-Rating: Why Average Current Isn't Enough
A pack sized correctly for runtime can still fail under load if its discharge rating is too low. A battery's C-rating describes how many multiples of its own capacity it can safely discharge continuously — a 3Ah pack rated at 5C can sustain 15A continuously, while the same 3Ah pack rated at 1C can only sustain 3A before its voltage sags hard and it heats up.
Check your peak, not your average: Using the inrush-adjusted peak current budget from the wiring guide's method (16-servo example scaled to 6 servos gives a peak near 9A during simultaneous multi-joint acceleration):
Choosing a pack rated meaningfully above the calculated minimum — 5C or higher in this example — keeps the pack running cooler and extends its cycle life, the same “don't run a supply at its rated maximum continuously” logic that applies to a wall-powered build.
BMS, Balance Charging, and Cell Safety
A multi-cell lithium pack is only as safe as its weakest cell. Cells in series drift apart in voltage over repeated cycles, and if one cell is driven below its safe minimum or above its safe maximum while the others sit at a normal voltage, that cell can be damaged or, in the worst case, go into thermal runaway. A battery management system (BMS) or a balance charger prevents this by monitoring and correcting individual cell voltages during charging.
- Always balance-charge multi-cell LiPo and Li-ion packs — never charge through the main power leads only on a pack with 2S or more cells in series.
- Set a low-voltage cutoff in firmware or hardware so the arm shuts down before any cell is driven below roughly 3.0–3.2V under load.
- Charge on a fireproof surface; unattended charging is not recommended for LiPo packs regardless of prior cycles.
- Inspect packs before every charge for puffing, punctures, or damaged wiring — a swollen cell should be retired, not charged.
Battery Placement and Mounting
Where the battery physically sits matters almost as much as its specification. A robot arm's shoulder and elbow joints already have to fight gravity and payload torque; adding battery mass anywhere past the base multiplies that problem, because torque scales with both mass and distance from the joint.
- Mount at or below the base whenever the mechanical design allows — this keeps battery mass out of the arm's moving inertia entirely and lowers the overall center of gravity.
- Avoid mounting near the wrist or end effector even if it seems convenient for wiring — distal mass forces you to oversize every upstream servo.
- Secure the pack mechanically — a battery that can shift under acceleration can stress its leads and subtly change payload during motion.
“A battery on a robot arm is a mechanical component before it's an electrical one — where you put the mass matters as much as how many amp-hours it holds.”— Alberto Gallardo, Computer Science and Robotics Teacher
Cost Breakdown
Representative costs for a battery power system sized to the 6-servo worked example above:
| Component | Approximate Cost (USD) |
|---|---|
| 3S LiPo pack, 3Ah, 5C+ rated, with balance connector | $25–$45 |
| Balance charger (2S–6S capable) | $25–$60 |
| Buck converter, 12V fixed output, 10A+ rated | $10–$20 |
| In-line fuse holder and low-voltage cutoff module | $8–$18 |
| Fireproof charging bag and mounting hardware | $10–$15 |
| Approximate total | $78–$158 |
Prices vary by capacity, brand, and region — confirm current pricing with your chosen supplier before treating these figures as fixed quotes.
Power System Safety Checklist
- Capacity verified against average current and target runtime, with a 25–30% margin.
- C-rating verified against peak current, not just the average.
- Voltage regulated to a fixed servo-rail voltage rather than wired straight from a raw multi-cell pack.
- Balance charging used for every charge cycle on multi-cell lithium packs.
- Low-voltage cutoff configured to protect cells during operation.
- Battery mounted at or near the base, secured mechanically, and clear of pinch points.
Related Resources
- Arduino Mega Wiring Guide for 6-DOF Robot Arms with Smart Servos
- Raspberry Pi vs Arduino vs ESP32: Choosing a Controller for Your Robot Arm
- The Complete 6-DOF Robot Arm Guide (2026)
Sources and References
- Battery and cell manufacturer datasheets — nominal voltage, discharge C-rating, and capacity specifications (verify against your specific pack).
- IEC 62133 — Safety requirements for portable sealed secondary lithium cells and batteries.
- UN 38.3 — Transport testing requirements referenced for lithium battery handling and shipping.
- UL 2054 — Household and commercial battery pack safety standard, referenced for general pack safety practice.
This article reflects my own build experience and publicly available manufacturer documentation. It does not contain sponsored placements or paid product endorsements. If that changes in future updates, it will be clearly disclosed here.
Frequently Asked Questions
Can I power a robot arm's servos from the same battery as the Arduino?
Not directly from the Arduino's own regulator. Run the servo bus from its own battery or its own regulated tap off a shared pack, and tie the grounds together at a single point. The servo rail draws far more current than the logic side and will brown out the controller if they share a regulator.
How do I size battery capacity for a robot arm?
Multiply your average system current draw in amps by the target runtime in hours to get the minimum amp-hour capacity, then add a 25–30% margin for battery aging and voltage sag. Separately check the pack's continuous discharge (C) rating against your calculated peak current, not just the average.
Is LiPo or a sealed lead-acid battery better for a robot arm?
LiPo offers much higher energy density and discharge capability per gram, which matters when the battery has to sit on a moving arm. Sealed lead-acid is heavier and bulkier per watt-hour but tolerates careless charging better and does not carry the same fire risk profile, which suits a stationary base-mounted design.
Do I need a battery management system (BMS) for a robot arm build?
For any multi-cell lithium pack (LiPo or Li-ion), yes. A BMS or a balance-charging routine prevents individual cells from being over-discharged or overcharged relative to each other, which is the leading cause of lithium battery fires in hobbyist builds.
Where should the battery be mounted on a robot arm?
As close to the base as the mechanical design allows. Mounting the battery near the base keeps it out of the arm's moving mass, which avoids adding torque load and rotational inertia to the shoulder and elbow joints that already have to move against gravity and payload.