Why Robot Arm Noise Is a Real Engineering Problem, Not Just an Annoyance
Robot arm noise gets dismissed as a cosmetic issue until it becomes a compliance problem, a collaborative workspace blocker, or an early warning sign of mechanical wear. A robot cell installed next to an office, a quality inspection station, or a collaborative assembly area where operators work in close proximity has real acoustic requirements that a standard industrial-grade arm was never designed to meet out of the box.
Beyond comfort, noise is diagnostic. A robot that was quiet at commissioning and has gotten progressively louder over months of operation is very often telling you something concrete: increasing backlash in a gearbox, a belt that has stretched out of tolerance, or bearing wear that will eventually show up as a positioning accuracy problem before it shows up as a mechanical failure. Treating noise reduction as pure acoustics misses half the value — it's also a maintenance indicator.
Where the Noise Actually Comes From
Before choosing a fix, it helps to know which joint or component is generating the noise. In a typical 6-axis arm, noise sources break down into a few distinct categories, each with a different root cause and a different fix:
| Noise Source | Typical Cause | Character of the Sound |
|---|---|---|
| Gear mesh noise | Spur gear tooth engagement, backlash, wear | Whining or grinding, increases with speed |
| Belt/pulley noise | Incorrect tension, worn teeth, misalignment | Slapping (loose) or high-pitched whine (over-tight) |
| Bearing noise | Insufficient lubrication, wear, contamination | Rumbling or grinding, often continuous |
| Servo motor whine | PWM switching frequency, resonance | High-frequency tone, constant pitch |
| Structural resonance | Panel or cover vibrating at a natural frequency | Buzzing or rattling during specific moves |
| Pneumatic exhaust | Gripper or tooling air exhaust ports | Sharp hissing burst on actuation |
Isolating the source usually takes nothing more sophisticated than running the robot through its program slowly while listening at each joint, or using a basic contact microphone or stethoscope-style listening tool against the housing. Fixing the wrong component — replacing a belt when the noise is actually gear backlash — wastes time and money without solving the problem.
Gear Selection: Helical vs. Spur Gears vs. Harmonic Drives
The single biggest design-level lever for noise reduction is the type of gear reduction used at each joint. This decision is usually made by the robot manufacturer, but it matters enormously when comparing models or specifying a custom-built arm.
Spur Gears
Spur gears have straight teeth that engage across their full width simultaneously. This full-width, instantaneous contact is mechanically simple and inexpensive to manufacture, but it also means the entire load transfers in a single abrupt engagement each time a tooth meshes — which is the primary source of the whining or grinding sound associated with cheaper gear reducers.
Helical Gears
Helical gears cut their teeth at an angle relative to the axis of rotation. This means each tooth engages gradually along a diagonal line rather than all at once, spreading the load transfer over time and dramatically smoothing out the mesh. The tradeoff is that the angled tooth geometry generates an axial thrust force that the gearbox housing and bearings must be designed to absorb, which is why helical gear reducers are typically more expensive and mechanically more complex than spur gear equivalents.
Harmonic Drives (Strain Wave Gearing)
Harmonic drives use a flexible spline that deforms elastically against a rigid circular spline, providing extremely high reduction ratios in a compact package with very low backlash. Because the tooth engagement is distributed across a large flex zone rather than concentrated at a single contact point, harmonic drives are inherently among the quietest reduction mechanisms available, which is a major reason they dominate the wrist and smaller joints of collaborative and precision robot arms.
"The gearbox is where most robot arm noise is born. Everything downstream — belts, enclosures, dampers — is compensating for a mesh design decision that was made long before the robot reached the factory floor."— Robotics Engineering, Mechanical Design Desk
Belt Tension and Timing Belt Noise
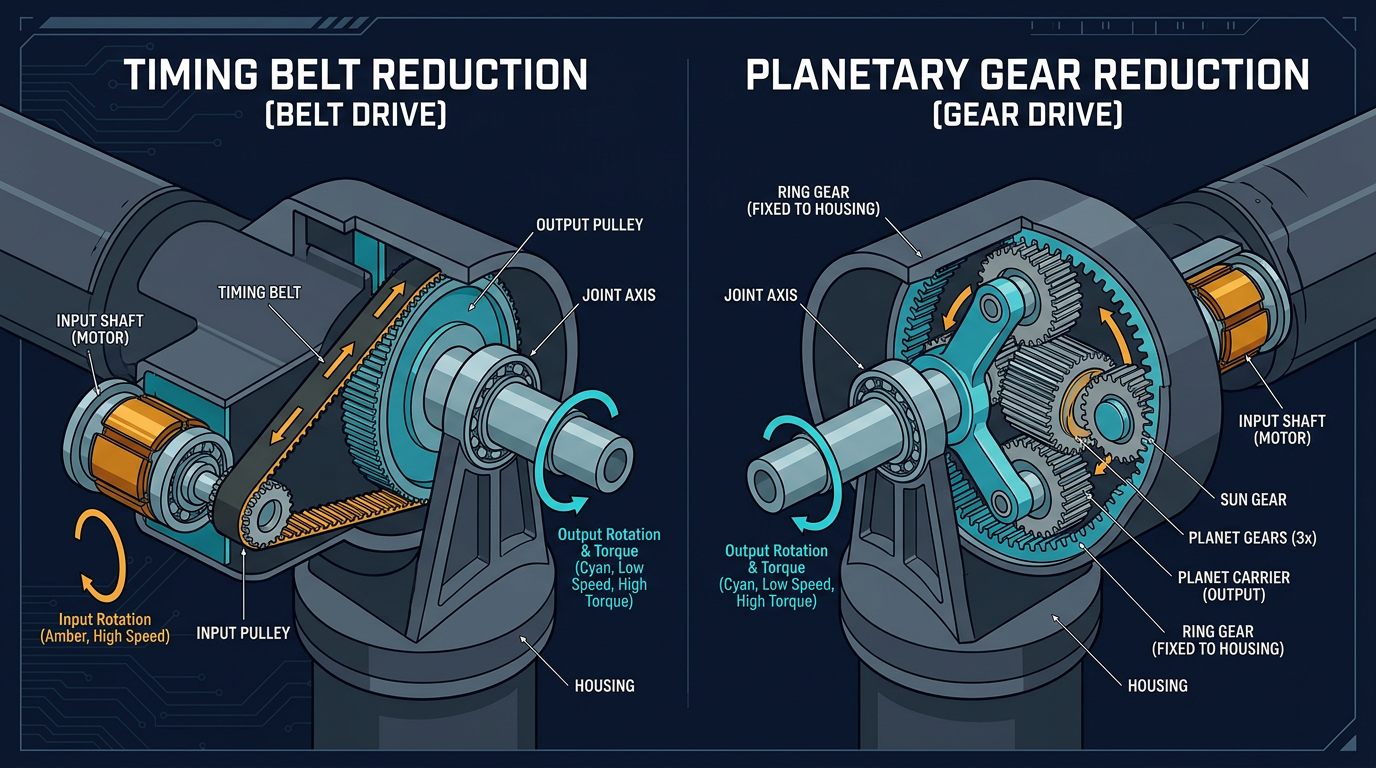
Many robot arm axes, particularly at the wrist and forearm, use timing belts rather than direct gear coupling to transmit motion from the motor to the joint. Belt-related noise is one of the most common and most fixable sources of robot arm noise, because it's almost entirely a function of tension and condition rather than a fundamental design constraint.
- Under-tensioned belts slap against pulley flanges during acceleration and deceleration, producing an audible rattling or clicking noise that gets worse at higher speeds and can eventually cause tooth skipping and positioning errors.
- Over-tensioned belts increase radial load on the motor and idler bearings, often producing a high-pitched whine and accelerating bearing wear — trading a noise problem today for a maintenance problem later.
- Worn or glazed belt teeth lose grip and produce an inconsistent noise pattern that changes as the belt continues to degrade, and should be replaced rather than re-tensioned.
Correct tension is specified by the robot manufacturer, usually as a deflection force at a given midpoint distance, and should be checked as part of routine preventive maintenance rather than only when noise becomes noticeable — by the time a loose belt is audible, measurable wear has often already occurred. For a full maintenance schedule covering belts and other wear components, see our 6-axis robot arm maintenance guide.
Vibration Dampers and Isolation Mounts
Even a robot with well-selected gearing and properly tensioned belts will generate some level of structural vibration, particularly during high-acceleration moves. Left unmanaged, this vibration transmits through the robot's base and mounting structure into the surrounding floor and equipment, amplifying perceived noise well beyond what the robot itself produces.
| Damping Method | Where It's Used | Typical Benefit |
|---|---|---|
| Rubber isolation mounts | Base mounting plate to floor/frame interface | Reduces structure-borne vibration transfer |
| Elastomeric joint bushings | Between gear housing and arm structure | Absorbs high-frequency mesh vibration |
| Tuned mass dampers | End of arm or wrist assembly | Counteracts resonant frequency oscillation |
| Viscoelastic damping tape/pads | Applied to thin sheet metal covers | Reduces panel resonance and buzzing |
Rubber isolation mounts at the base are usually the highest-value retrofit for existing installations, since they address vibration transfer to the floor and surrounding structure without requiring any disassembly of the robot's internal gearing. Tuned mass dampers and elastomeric bushings typically require manufacturer support or a qualified integrator, since incorrect placement can shift the resonant frequency into a worse range rather than damping it.
Acoustic Enclosure Design
When gear selection, belt maintenance, and vibration damping have been addressed and further reduction is still needed — commonly the case in office-adjacent or collaborative environments — an acoustic enclosure is the remaining lever. The design principles are straightforward but easy to get wrong:
- Mass and absorption, not just a barrier. A rigid enclosure alone reflects sound; adding an absorptive lining (acoustic foam, mineral wool panels) inside the enclosure prevents reflected noise from re-radiating out through access openings.
- Clearance from the working envelope. The enclosure must sit entirely outside the robot's maximum reach in every axis, including any tooling extension, to avoid a collision hazard.
- Ventilation without acoustic leakage. Cooling openings should use baffled or labyrinth-style vents rather than open slots, which allow airflow while blocking direct line-of-sight sound transmission.
- Transparent panel sections in polycarbonate allow visual monitoring of the cell without compromising the enclosure's acoustic performance, and are commonly required anyway for safety observation per ANSI/CSA robot safety guidelines.
- Access door seals using compressible gaskets prevent sound leakage at the most common weak point in an otherwise well-designed enclosure.
A well-executed enclosure design typically achieves the largest single reduction of any measure discussed in this guide, but it should be treated as the last layer applied after mechanical noise sources have already been minimized — an enclosure built around a poorly maintained, noisy gearbox simply traps more sound energy that then leaks out through every seam and vent.
OSHA 1910.95 and Workplace Noise Exposure Limits
In the United States, workplace noise exposure is governed by OSHA 1910.95, which sets a permissible exposure limit of 90 dBA averaged over an 8-hour shift, using a 5 dB exchange rate (meaning exposure time must be cut in half for every 5 dB increase above the limit). A hearing conservation program, including audiometric testing and hearing protection availability, is required once an 8-hour time-weighted average reaches 85 dBA.
A single well-maintained robot arm operating in isolation rarely approaches these thresholds on its own. The practical risk in most facilities comes from cumulative noise in a shared robot cell — multiple arms, conveyors, pneumatic tooling, and ambient plant noise combining to push time-weighted averages into hearing conservation territory. In Canada, equivalent requirements are set at the provincial level (for example, Ontario's Noise Regulation under the Occupational Health and Safety Act), and generally follow similar exposure limit structures.
Reference Decibel Levels for Context
Decibels are logarithmic, so small-sounding differences represent large changes in actual sound energy — a 10 dB increase represents roughly a doubling of perceived loudness. The reference points below provide context for evaluating a robot cell's measured noise level against familiar benchmarks.
These figures are illustrative reference ranges based on typical published sound pressure data for industrial equipment categories, not a guarantee for any specific robot model. Always measure the actual installed cell with a calibrated sound level meter at the operator position for compliance purposes — ambient noise, tooling, and cell geometry all affect the reading significantly.
Noise Reduction Retrofit Checklist
For an existing robot cell that has become noticeably louder over time, work through these steps in order of cost and complexity before jumping straight to an enclosure:
- Check and correct belt tension on all belt-driven axes against the manufacturer's specification — the lowest-cost fix with often the most noticeable improvement.
- Inspect for backlash in gear-driven joints using a dial indicator at the end-effector; excessive backlash indicates gear wear that tensioning alone cannot fix.
- Verify lubrication levels and grease condition in gearboxes per the maintenance schedule — contaminated or depleted lubricant is a common, easily overlooked noise source.
- Tighten and inspect all structural fasteners on covers and panels, since loose sheet metal is a frequent source of buzzing that has nothing to do with the drivetrain.
- Add rubber isolation mounts at the base if vibration is transmitting into the floor or surrounding frame.
- Apply damping pads to resonant panels identified during a slow-speed listening inspection.
- Consider an acoustic enclosure only after the above mechanical measures have been addressed, sized and placed to clear the full working envelope.
Related Resources
- 6-Axis Robot Arm Maintenance Schedule: Preventive Care for Maximum Uptime
- Robot Arm Safety Standards: ANSI RIA, CSA Z434 & ISO Compliance
- Robot Arm Payload Calculator: How to Size a 6-DOF Arm for Your Load
- The Complete 6-DOF Robot Arm Guide (2026)
Sources and References
- Occupational Safety and Health Administration (OSHA) — 29 CFR 1910.95, Occupational Noise Exposure standard.
- International Organization for Standardization (ISO) — ISO 11201, acoustic emission measurement methodology for machinery.
- Association for Advancing Automation (A3) — industrial robot mechanical design and maintenance best practices.
- Ontario Ministry of Labour — Noise Regulation (O. Reg. 381/15) under the Occupational Health and Safety Act.
Frequently Asked Questions
Why are some robot arms much louder than others?
Noise differences between robot arms usually come down to the type of gear reduction used at each joint, the condition and tension of any belts or timing chains, backlash in the gearing, and whether the robot uses a harmonic drive versus a simple spur gear reducer. Older or poorly maintained units also generate more noise from worn bearings and loose fasteners.
What is the OSHA noise exposure limit for a robot cell?
Under OSHA 1910.95, the permissible exposure limit is 90 dBA averaged over an 8-hour work shift, with a 5 dB exchange rate. Hearing conservation program requirements begin at an 8-hour time-weighted average of 85 dBA. Most modern industrial robot arms operating alone fall below these thresholds, but ambient noise from surrounding equipment can push cumulative levels higher.
Do helical gears really reduce robot arm noise compared to spur gears?
Yes. Because helical gear teeth engage gradually along an angled path rather than making full-width contact all at once, they produce noticeably less noise and vibration than equivalent spur gears at the same load and speed. The tradeoff is a small amount of axial thrust load that the housing and bearings must be designed to handle.
Can an acoustic enclosure reduce robot arm noise without affecting performance?
Yes, when designed correctly. A well-designed acoustic enclosure using sound-dampening panels or polycarbonate with an absorptive lining can meaningfully reduce perceived noise without restricting the robot's motion, as long as it is placed outside the robot's working envelope and doesn't interfere with cabling, cooling, or safety interlocks.
How much does belt tension affect robot arm noise?
Significantly. A belt that is too loose will slap and generate a rattling noise during acceleration and deceleration, while a belt that is over-tensioned increases bearing load and can produce a high-pitched whine. Correct tension, checked periodically, is one of the lowest-cost noise reduction measures available.
Primary sources and further reading
These references support the general engineering concepts in this guide. Confirm every safety-relevant limit in the current documentation before you rely on it.
Links checked: August 5, 2026.